Using the SEG-Y To GIS Tools
Overview
The best way to make 3D seismic data available in ArcGIS (and web maps) is to click the Seismic Utilities...
Input and Header
The many tools to make 3D seismic files GIS-ready, including seting up a web...
Convert SEG-Y file to GIS
Enter the required information about the survey. If needed run the...
Combine/Crop/Project Seismic Data
The next button combines many tools to optimize data for its eventual use in...
Create Seismic Layer
This tool loads the NetCDF as a Voxel Layer, setting a default red, white...
Create Scene Layer Package to publish
The next button calls Esri's standard Create Voxel Scene Layer Content...
Create Web Application
The last button launches another window used to put in parameters of the scene...
Overview
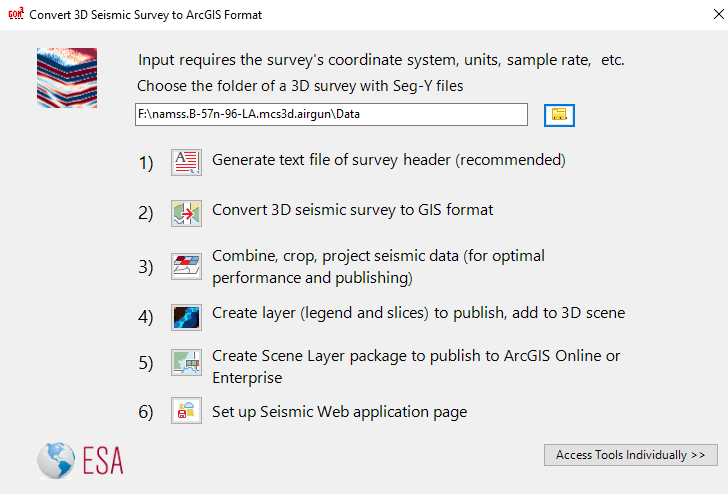
The best way to make 3D seismic data available in ArcGIS (and web maps) is to click the Seismic Utilities button on the toolbar in ArcGIS. This interface launches tools in a way that streamlines the many steps to set up 3D seismic data for use in ArcGIS Pro and online web maps.

Input and Header
The many tools to make 3D seismic files GIS-ready, including seting up a web application to view 3D seismic data online, is contained in the window after clicking the Seismic Utilities button. The utilities can convert all files in a single folder (presumably representing a single 3D survey). At the top of the window, type or click the folder button to select a folder containing SEG-Y files.
The first tool converts the SEG-Y header to a text file. This step is optional, and if an accompanying file is available, such as a Word document or PDF, that may be preferrable with more information.
Convert SEG-Y file to GIS
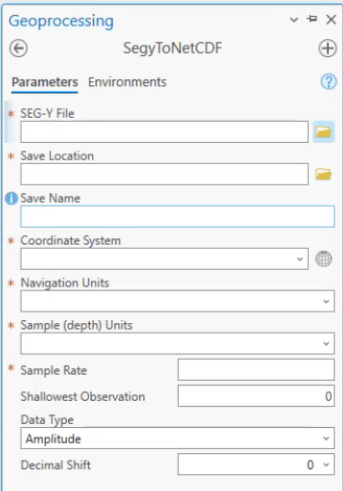
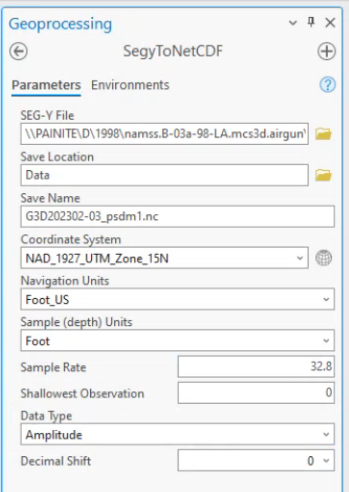
Enter the required information about the survey. If needed run the Export SEG-Y Header tool to export the header data as a text file to find this information.
- The folder containing the 3D seismic survey should automatically fill the first input from the previous window.
- The output location is the same as the SEG-Y. A shapefile of the footprint of the survey is created in the same folder for each SEG-Y file.
- Enter the coordinate system of survey.
- Enter the navigation units, sample units and sample rate of the survey.
- Select the data type.
- Select the number of places to shift the decimal. For most modern SEG-Y files this can be left as Auto because the tool will automatically determine the decimal shift. However, if your data is not placed correctly or the tool errors out then you may have to specify. Two is the most common decimal shift.
- Click Run.
- When the process is finished the NetCDF and shapefile will be saved in the given location.
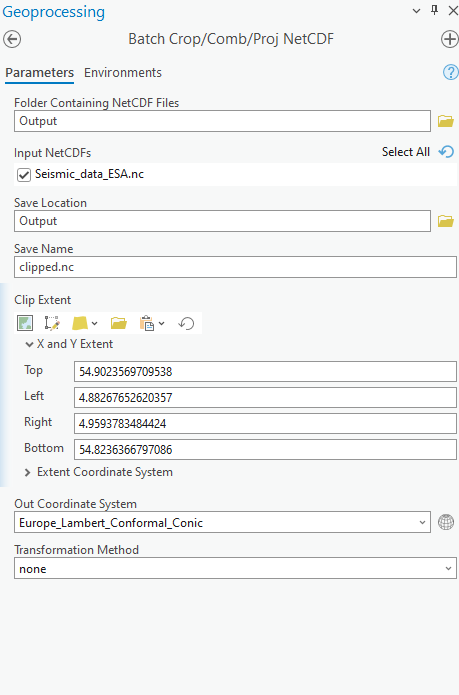
Combine/Crop/Project Seismic Data
The next button combines many tools to optimize data for its eventual use in a web application or small ArcGIS Project. This step is optional when loading into ArcGIS Pro which can handle far more data.
- After choosing the folder containing the NetCDF(s), the output name for the converted NetCDF is chosen.
- The next section provides a variety of options to clip or combine the NetCDF(s), including the whole visible section to drawing a box of the desired area to using another file to clip the extent.
- Finally a new projected coordinate system is chosen, including a datum transformation, if necessary.
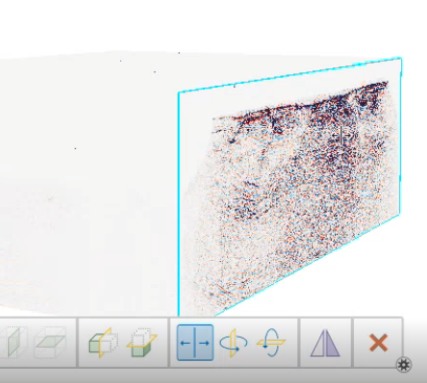
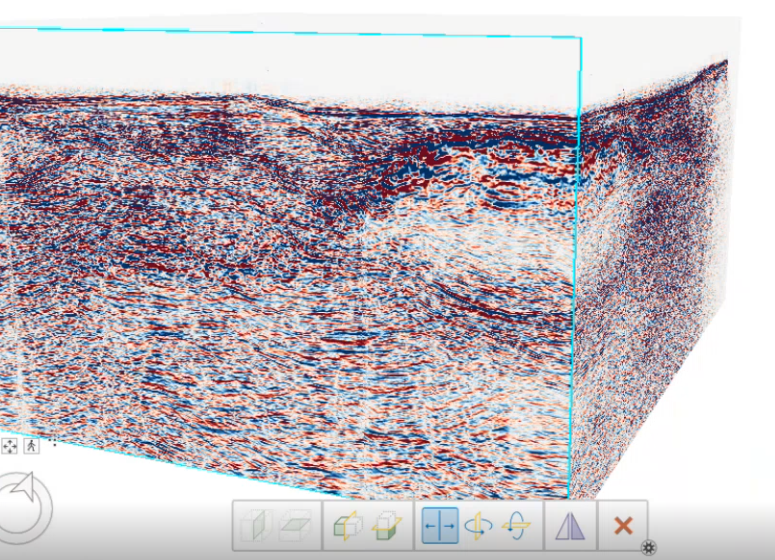
Create Seismic Layer
This tool loads the NetCDF as a Voxel Layer, setting a default red, white and blue symbology (for amplitudes) and a rainbow symbology (for velocity). Once loaded into a 3D scene, the symbology can be modified, slices can be created and the layer's vertical exaggeration can be modified to match the depth of the seismic section (if the seismic data is recorded in depth).

Create Scene Layer Package to publish
The next button calls Esri's standard Create Voxel Scene Layer Content tool. This is only used if publishing data online, such as ArcGIS Online or Enterprise.
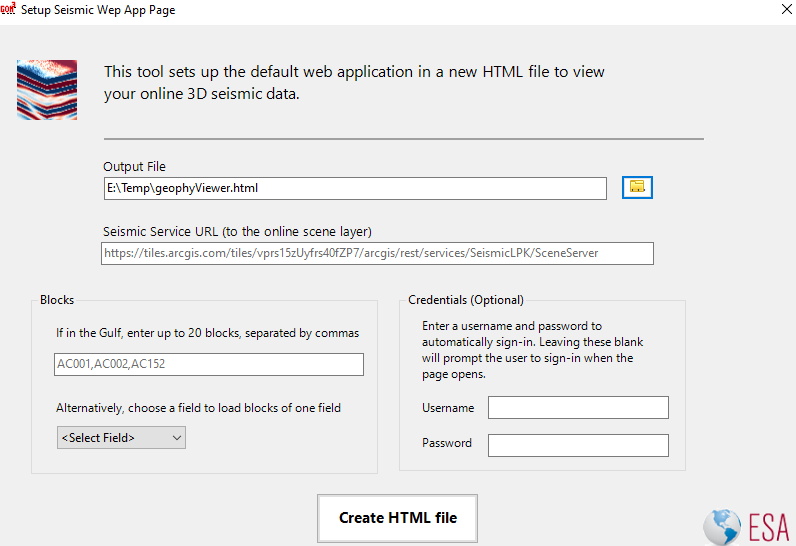
Create Web Application
The last button launches another window used to put in parameters of the scene layer packaged in the last step. The first input saves a new HTML file, the second input is to fill in the URL of the published service. If in the Gulf of Mexico, the options on the left take in a list of blocks or a field to load existing GOM3 data. On the right, credentials to log in for the web service can be written into the HTML file. If shared outside of your organization, it is recommended not to include the credentials as it will be visible within the HTML.